TS 黑马头条案例
基础结构 - 直接复制
完成:项目的基础结构搭建
基础样式:styles/index.css
css
* {
  margin: 0;
  box-sizing: border-box;
}
#app {
  height: 100vh;
  overflow: hidden;
  display: flex;
  flex-direction: column;
}
.channel-nav {
  height: 44px;
  overflow-x: auto;
  box-shadow: 0 2px 10px rgba(0, 0, 0, 0.1);
}
.channel-nav::-webkit-scrollbar {
  display: none;
}
.channel-nav .list {
  display: flex;
}
.channel-nav .item {
  padding: 0 15px;
  height: 44px;
  text-align: center;
  line-height: 44px;
  text-decoration: none;
  font-size: 14px;
  color: #999;
  white-space: nowrap;
  -webkit-tap-highlight-color: transparent;
  position: relative;
  transition: all 0.3s;
}
.channel-nav .item::after {
  content: '';
  position: absolute;
  left: 50%;
  bottom: 0;
  width: 0px;
  height: 2px;
  border-radius: 1px;
  background-color: coral;
  transform: translateX(-50%);
  transition: all 0.3s;
}
.channel-nav .item.active::after {
  width: 24px;
}
.channel-nav .item.active {
  color: #333;
  font-size: 18px;
}
.article-list {
  flex: 1;
  overflow-y: auto;
  padding: 0 15px;
}
.article-item {
  padding: 15px 0;
  border-bottom: 0.5px solid rgba(0,0,0,.07);
}
.article-item .title {
  width: 100%;
  margin: 0;
  line-height: 22px;
  font-size: 16px;
  color: #333;
  margin-bottom: 8px;
  max-height: 44px;
  display: -webkit-box;
  overflow: hidden;
  text-overflow: ellipsis;
  -webkit-box-orient: vertical;
  -webkit-line-clamp: 2;
}
.article-item .img {
  width: 30%;
  height: 74px;
  border-radius: 4px;
  margin-bottom: 8px;
  margin-right: 3%;
}
.article-item .info {
  width: 100%;
  color: #a5a6ab;
  font-size: 12px;
  position: relative;
}
.article-item .info span {
  margin-right: 12px;
}使用样式 main.ts
ts
import { createApp } from 'vue';
import './styles/index.css'
import App from './App.vue';

createApp(App).mount('#app');准备组件:
components/ChannelNav.vue
vue
<script setup lang="ts"></script>

<template>
  <div class="channel-nav">
    <nav class="list">
      <a
        class="item"
        :class="{ active: i === 0 }"
        href="javascript:;"
        v-for="(item, i) in 10"
        :key="i"
      >
        推荐{{ item }}
      </a>
    </nav>
  </div>
</template>components/ArticleList.vue
vue
<script setup lang="ts"></script>
<template>
<div class="article-list">
<div class="article-item" v-for="i in 10" :key="i">
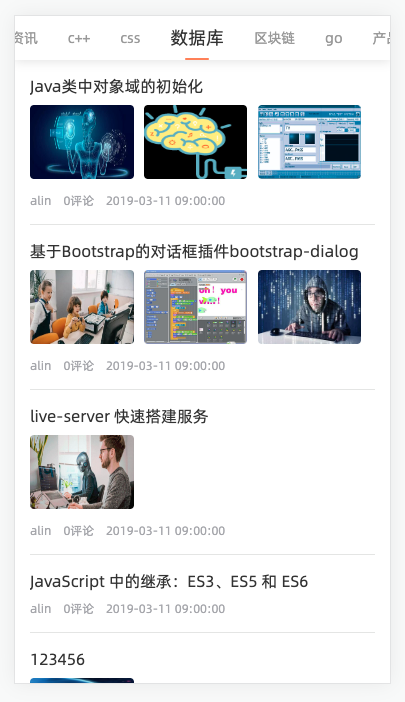
<p class="title">迪桑娜开发就加快速度的教案设计顶课了撒建档立卡撒娇大理石</p>
<img class="img" src="https://yanxuan-item.nosdn.127.net/7afec01ce36598c7d22173b6c0e7fcf6.jpg" alt="">
<img class="img" src="https://yanxuan-item.nosdn.127.net/7afec01ce36598c7d22173b6c0e7fcf6.jpg" alt="">
<img class="img" src="https://yanxuan-item.nosdn.127.net/7afec01ce36598c7d22173b6c0e7fcf6.jpg" alt="">
<div class="info">
<span>小兵张嘎</span>
<span>17评论</span>
<span>1天前</span>
</div>
</div>
</div>
</template>使用组件:App.vue
vue
<script setup lang="ts">
import ChannelNav from './components/ChannelNav.vue';
import ArticleList from './components/ArticleList.vue'
</script>

<template>
  <ChannelNav></ChannelNav>
  <ArticleList></ArticleList>
</template>axios-请求频道列表数据
掌握:项目中axios的封装写法
安装 :
npm i axios封装
utils/request.ts封装API接口函数:
api/channel.ts挂载后发送请求
代码:
- 安装 :
npm i axios - 封装
utils/request.ts
ts
import axios from "axios";

const request = axios.create({
  baseURL: "http://geek.itheima.net",
});

request.interceptors.request.use(
  function (config) {
    return config;
  },
  function (error) {
    return Promise.reject(error);
  }
);

request.interceptors.response.use(
  function (response) {
    return response.data;
  },
  function (error) {
    return Promise.reject(error);
  }
);

export default request;- 封装API接口函数:
api/channel.ts
ts
import request from "../utils/request";

export const getChannelsAPI = () => {
  return request({ url: "/v1_0/channels" });
};- 挂载后,发送请求
ts
onMounted(async () => {
  const res = await getChannelAPI()
  console.log('res  ----->  ', res);
})频道渲染
完成:axios获取数据后频道列表渲染
步骤:
- 共享类型到
types/data.d.ts目录 - 在组件初始化通过
axios.get获取数据 - 进行渲染
types/data.d.ts
ts
// 频道对象
export type ChannelItem = {
  id: number;
  name: string;
};ChannelNav.vue
vue
<script setup lang="ts">
import axios from 'axios';
import { onMounted, ref } from 'vue';
import { ChannelItem } from '../types/data'
// 创建响应式数据
const channels = ref<ChannelItem[]>([])
onMounted(async ()=>{
  const res = await getChannelAPI()
  // 给响应式数据赋值
  channels.value = res.data.channels
})
</script>

<template>
  <div class="channel-nav">
    <nav class="list">
      <a
        class="item"
        href="javascript:;"
        v-for="(item, i) in channels"
        :key="item.id"
      >
        {{item.name}}
      </a>
    </nav>
  </div>
</template>导航切换
完成:频道导航切换效果
- 切换的频道ID将来需要给
ArticleList组件使用,所以在App组件定义数据 - 在
ChannelNav改变频道的时候,通过自定义事件传递给App组件使用和修改
默认选中
App.vue
vue
<script setup lang="ts">
import ChannelNav from './components/ChannelNav.vue';
import ArticleList from './components/ArticleList.vue'
import { ref } from 'vue';

// 数据App维护,因为切换频道ID的时候 列表需要根据频道ID更新
const channelId = ref(0)
</script>

<template>
  <ChannelNav :channelId="channelId"></ChannelNav>
  <ArticleList></ArticleList>
</template>ChannelNav.vue
diff
// 2. 父传子
+defineProps<{ channelId: number }>()
</script>

<template>
  <div class="channel-nav">
    <nav class="list">
      <a
        class="item"
+        :class="{active: channelId === item.id}"
        href="javascript:;"
v-for="item in channels"进行切换
ChannelNav.vue
diff
+const emit = defineEmits<{
+  (e: 'changeChannel', id: number): void;
+}>();
</script>

<template>
  <div class="channel-nav">
    <nav class="list">
      <a
        class="item"
        :class="{ active: channelId === item.id }"
        href="javascript:;"
        v-for="item in channels"
        :key="item.id"
+        @click="emit('changeChannel', item.id)"
      >
        {{ item.name }}
      </a>
    </nav>
  </div>
</template>App.vue
xml
<ChannelNav :channelId="channelId" @change-channel="channelId = $event"></ChannelNav>请求文章列表
实现:频道切换后列表更新
步骤:
封装API函数
父传子channelId
监听channelId变化,开启默认执行
代码:
- 封装API函数
ts
import request from "../utils/request";

export const getArticleAPI = (channel_id: number) => {
  return request({
    url: "/v1_0/articles",
    params: {
      channel_id,
      timestamp: Date.now,
    },
  });
};- 父传子channelId
App.vue
xml
<ArticleList :channelId="channelId" />- 监听频道ID变化,开启默认执行,获取数据
ArticleList.vue
ts
import axios from 'axios';
import { ref, watch } from 'vue';

const props = defineProps<{ channelId: number }>();
const loadData = async () => {
  const res = await getArticleAPI(props.channelId)
  console.log('res  ----->  ', res);
}

watch(
  () => props.channelId,
  () => {
    loadData()
  },
  { immediate: true }
);渲染文章列表
目标:实现渲染界面
步骤:
data.d.ts中定义类型- 声明变量
articles - 渲染数据
代码:
data.d.ts中定义类型
ts
interface Cover {
  type: 0 | 1 | 3;
  images?: string[];
}

export interface ArticleItem {
  art_id: string;
  title: string;
  aut_id: string;
  comm_count: number;
  pubdate: string;
  aut_name: string;
  is_top: number;
  cover: Cover;
}- 声明变量
articles、保存数据
ts
const articles = ref<ArticleItem[]>([])
const loadData = async () => {
  const res = await getArticleAPI(props.channelId)
  articles.value = res.data.results
}- 渲染数据
vue
<template>
  <div class="article-list">
    <div class="article-item" v-for="item in articles" :key="item.art_id">
      <p class="title">{{ item.title }}</p>
      <img
        v-for="(src, i) in item.cover.images"
        :key="i"
        class="img"
        :src="src"
        alt=""
      />
      <div class="info">
        <span>{{ item.aut_name }}</span>
        <span>{{ item.comm_count }}评论</span>
        <span>{{ item.pubdate }}</span>
      </div>
    </div>
  </div>
</template>了解-Typescript和Axios
ts
export interface AxiosInstance extends Axios {
  <T = any, R = AxiosResponse<T>, D = any>(config: AxiosRequestConfig<D>): Promise<R>;
  <T = any, R = AxiosResponse<T>, D = any>(url: string, config?: AxiosRequestConfig<D>): Promise<R>;

}ts
import { ChannelItem } from "../utils/data";
import request from "../utils/request";

export const getChannelAPI = () => {
  return request<{ channels: ChannelItem[] }>({
    url: "/v1_0/channels",
  });
};