用户模块
布局容器-效果预览
布局容器-嵌套路由
实现:首页,健康百科,消息通知,我的,布局容器的搭建
步骤:
- 准备四个二级页面组件:Home、Article、Notify、User
- 配置嵌套路由
- 设置二级路由出口
代码:
- 准备二级页面组件,直接从素材中获取
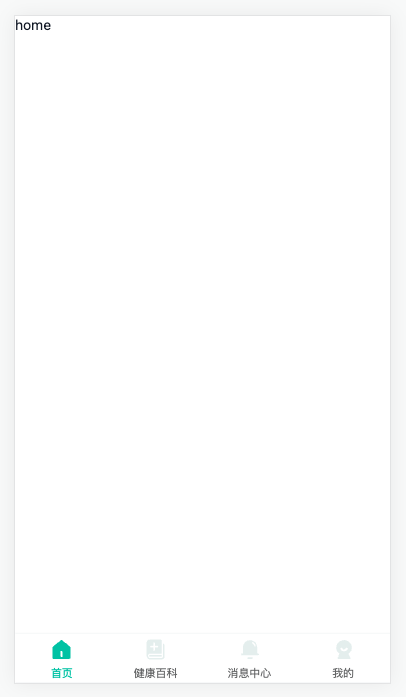
Home/index.vue
<script setup lang="ts"></script>

<template>
  <div class="home-page">home</div>
</template>

<style lang="scss" scoped></style>Article/index.vue
<script setup lang="ts"></script>

<template>
  <div class="article-page">home</div>
</template>

<style lang="scss" scoped></style>Notify/index.vue
<script setup lang="ts"></script>

<template>
  <div class="notify-page">home</div>
</template>

<style lang="scss" scoped></style>User/index.vue
<script setup lang="ts"></script>

<template>
  <div class="user-page">home</div>
</template>

<style lang="scss" scoped></style>- 配置嵌套路由:
router/index.ts
routes: [
  { path: "/login", component: () => import("@/views/Login/index.vue") },
  {
    path: "/",
    component: () => import("@/views/Layout/index.vue"),
    redirect: "/home",
    children: [
      { path: "/home", component: () => import("@/views/Home/index.vue") },
      {
        path: "/article",
        component: () => import("@/views/Article/index.vue"),
      },
      { path: "/notify", component: () => import("@/views/Notify/index.vue") },
      { path: "/user", component: () => import("@/views/User/index.vue") },
    ],
  },
];- 配置二级路由出口:
Layout/index.vue
<script setup lang="ts"></script>

<template>
  <div class="layout-page">
+    <router-view />
    layout
  </div>
</template>

<style lang="scss" scoped></style>布局容器-底部 tab 栏-自定义图标
实现:底部 tab 的切换
步骤:
- 查文档,使用
tabbar组件, 实现路由切换功能 - 查文档,给
tabbar加上自定义图标
代码:
- 路由切换功能
<van-tabbar route>
  <van-tabbar-item to="/home">首页</van-tabbar-item>
  <van-tabbar-item to="/article">健康百科</van-tabbar-item>
  <van-tabbar-item to="/notify">消息中心</van-tabbar-item>
  <van-tabbar-item to="/user">我的</van-tabbar-item>
</van-tabbar>- 自定义图标
<script setup lang="ts"></script>

<template>
  <div class="layout-page">
    <router-view />
    <van-tabbar route>
      <van-tabbar-item to="/home">
        首页
        <template #icon="{ active }">
          <cp-icon
            :name="active ? 'home-index-active' : 'home-index-default'"
          />
        </template>
      </van-tabbar-item>
      <van-tabbar-item to="/article">
        健康百科
        <template #icon="{ active }">
          <cp-icon :name="`home-article-${active ? 'active' : 'default'}`" />
        </template>
      </van-tabbar-item>
      <van-tabbar-item to="/notify">
        消息中心
        <template #icon="{ active }">
          <cp-icon :name="`home-notice-${active ? 'active' : 'default'}`" />
        </template>
      </van-tabbar-item>
      <van-tabbar-item to="/user">
        我的
        <template #icon="{ active }">
          <cp-icon :name="`home-mine-${active ? 'active' : 'default'}`" />
        </template>
      </van-tabbar-item>
    </van-tabbar>
  </div>
</template>

<style lang="scss" scoped></style>布局容器-显示加载进度
目标:显示加载进度
- 懒加载的组件,在切换路由的时候,异步加载资源,网速不好会 “白屏”
- 加上进度条,提高用户体验
步骤:
代码:
- 安装插件,
router/index.ts中导入模块、导入样式
pnpm i nprogress
pnpm i @types/nprogress -Dimport NProgress from "nprogress";
import "nprogress/nprogress.css";- 导航前置守卫,开启进度条
+ router.beforeEach(() => {
+  // 💥 注意开启后,不会自动关闭
+  NProgress.start()
+ }- 导航后置守卫,关闭进度条
router.afterEach(() => {
  NProgress.done();
});- 查文档,修改配置:关闭旋转按钮,颜色修改
router/index.ts
NProgress.configure({
  showSpinner: false,
});main.scss
#nprogress .bar {
  background-color: var(--cp-primary) !important;
}布局容器-页面标题
实现:切换页面切换标题,扩展
vue-router的类型
步骤:
- 给每一个路由,添加 元信息 数据
- 后置守卫中,通过 to.meta 接收元信息,完成修改标题
- 优化-扩展元信息类型
代码:
- 给每一个路由添加 元信息 数据
router/index.ts
const router = createRouter({
  history: createWebHistory(import.meta.env.BASE_URL),
  routes: [
    {
      path: '/',
      component: () => import('@/views/Layout/index.vue'),
      redirect: '/home',
      children: [
        {
          path: '/home',
          component: () => import('@/views/Home/index.vue'),
+          meta: { title: '首页' }
        },
        {
          path: '/article',
          component: () => import('@/views/Article/index.vue'),
+          meta: { title: '健康百科' }
        },
        {
          path: '/notify',
          component: () => import('@/views/Notify/index.vue'),
+          meta: { title: '消息通知' }
        },
        {
          path: '/user',
          component: () => import('@/views/User/index.vue'),
+          meta: { title: '个人中心' }
        }
      ]
    },
    {
      path: '/login',
      component: () => import('@/views/Login/index.vue'),
+      meta: { title: '登录' }
    }
  ]
})- 后置守卫中,通过 to.meta 接收元信息,完成修改标题
router/index.ts
router.afterEach((to) => {
  // 处理标题
+  document.title = `优医问诊-${to.meta.title || ''}`
  // ...省略其它代码
}- 扩展元信息类型
types/vue-router.d.ts
import "vue-router";

declare module "vue-router" {
  // 扩展 元信息类型
  interface RouteMeta {
    // 标题
    title?: string;
  }
}请求函数自动带上 token
目标:大多接口需要传参 token,请求拦截器中,自动带上 token
utils/request.ts
request.interceptors.request.use(

 function (config) {
+   const store = useUserStore()
+   const token = store.userInfo?.token
+   if (token) {
+     config.headers.Authorization = `Bearer ${token}`
+   }
    return config
  },
  function (err) {
    return Promise.reject(err)
  }
)个人中心
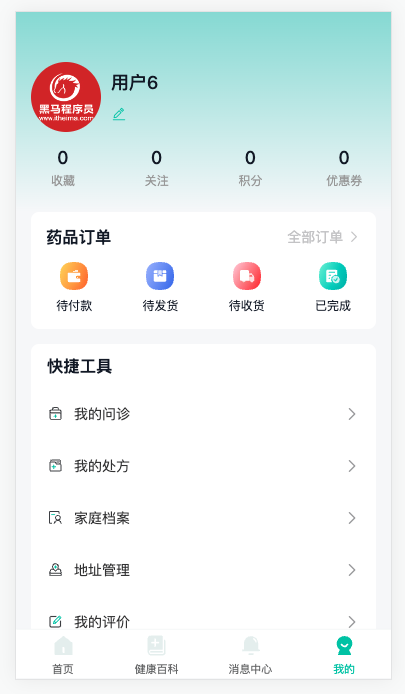
个人中心-头部展示
实现:头部个人信息展示与订单卡片布局
步骤:
- 准备静态结构
- 定义 API 函数
- 获取数据
- 定义类似,插值渲染
代码:
1)准备静态结构 view/User/index.vue
<script setup lang="ts"></script>

<template>
  <div class="user-page">
    <div class="user-page-head">
      <div class="top">
        <van-image
          round
          fit="cover"
          src="https://yanxuan-item.nosdn.127.net/ef302fbf967ea8f439209bd747738aba.png"
        />
        <div class="name">
          <p>用户907456</p>
          <p><van-icon name="edit" /></p>
        </div>
      </div>
      <van-row>
        <van-col span="6">
          <p>150</p>
          <p>收藏</p>
        </van-col>
        <van-col span="6">
          <p>23</p>
          <p>关注</p>
        </van-col>
        <van-col span="6">
          <p>270</p>
          <p>积分</p>
        </van-col>
        <van-col span="6">
          <p>3</p>
          <p>优惠券</p>
        </van-col>
      </van-row>
    </div>
    <div class="user-page-order">
      <div class="head">
        <h3>药品订单</h3>
        <router-link to="/order"
          >全部订单 <van-icon name="arrow"
        /></router-link>
      </div>
      <van-row>
        <van-col span="6">
          <cp-icon name="user-paid" />
          <p>待付款</p>
        </van-col>
        <van-col span="6">
          <cp-icon name="user-shipped" />
          <p>待发货</p>
        </van-col>
        <van-col span="6">
          <cp-icon name="user-received" />
          <p>待收货</p>
        </van-col>
        <van-col span="6">
          <cp-icon name="user-finished" />
          <p>已完成</p>
        </van-col>
      </van-row>
    </div>
  </div>
</template>

<style lang="scss" scoped>
.user-page {
  background-color: var(--cp-bg);
  min-height: calc(100vh - 50px);
  padding: 0 15px 65px;
  // 头部
  &-head {
    height: 200px;
    background: linear-gradient(
      180deg,
      rgba(44, 181, 165, 0.46),
      rgba(44, 181, 165, 0)
    );
    margin: 0 -15px;
    padding: 0 15px;
    .top {
      display: flex;
      padding-top: 50px;
      align-items: center;
      .van-image {
        width: 70px;
        height: 70px;
      }
      .name {
        padding-left: 10px;
        p {
          &:first-child {
            font-size: 18px;
            font-weight: 500;
          }
          &:last-child {
            margin-top: 10px;
            color: var(--cp-primary);
            font-size: 16px;
          }
        }
      }
    }
    .van-row {
      margin: 0 -15px;
      padding-top: 15px;
      p {
        text-align: center;
        &:first-child {
          font-size: 18px;
          font-weight: 500;
        }
        &:last-child {
          color: var(--cp-dark);
          font-size: 12px;
          padding-top: 4px;
        }
      }
    }
  }
  // 订单
  &-order {
    background-color: #fff;
    border-radius: 8px;
    margin-bottom: 15px;
    padding-bottom: 15px;
    .head {
      display: flex;
      justify-content: space-between;
      line-height: 50px;
      padding: 0 15px;
      a {
        color: var(--cp-tip);
      }
    }
    .van-col {
      text-align: center;
      .cp-icon {
        font-size: 28px;
      }
      p {
        font-size: 12px;
        padding-top: 4px;
      }
    }
  }
}
</style>2)定义 API 函数
services/user.ts
// 获取个人信息
export const getUserInfoAPI = () => {
  return request({
    url: "/patient/myUser",
  });
};3)获取数据进行渲染
import { onMounted, ref } from "vue";
import { getUserInfoAPI } from "@/services/user";
import type { IUserInfo } from "@/types/user";

const userInfo = ref<IUserInfo>({} as IUserInfo);

const loadData = async () => {
  const res = await getUserInfoAPI();
  userInfo.value = res.data;
};
onMounted(loadData);+<div class="user-page" v-if="user">
<div class="user-page-head">
<div class="top">
+ <van-image round fit="cover" :src="user.avatar" />
<div class="name">
+ <p>{{ userInfo.account }}</p>
<p><van-icon name="edit" /></p>
</div>
</div>
<van-row>
<van-col span="6">
+ <p>{{ userInfo.collectionNumber }}</p>
<p>收藏</p>
</van-col>
<van-col span="6">
+ <p>{{ userInfo.likeNumber }}</p>
<p>关注</p>
</van-col>
<van-col span="6">
+ <p>{{ userInfo.score }}</p>
<p>积分</p>
</van-col>
<van-col span="6">
+ <p>{{ userInfo.couponNumber }}</p>
<p>优惠券</p>
</van-col>
</van-row>
</div>
<div class="user-page-order">
<div class="head">
<h3>药品订单</h3>
<router-link to="/order">全部订单 <van-icon name="arrow" /></router-link>
</div>
<van-row>
<van-col span="6">
+ <van-badge :content="userInfo.orderInfo?.paidNumber || ''">
<cp-icon name="user-paid" />
+ </van-badge>
<p>待付款</p>
</van-col>
<van-col span="6">
+ <van-badge :content="userInfo.orderInfo?.shippedNumber || ''">
<cp-icon name="user-shipped" />
+ </van-badge>
<p>待发货</p>
</van-col>
<van-col span="6">
+ <van-badge :content="userInfo.orderInfo?.receivedNumber || ''">
<cp-icon name="user-received" />
+ </van-badge>
<p>待收货</p>
</van-col>
<van-col span="6">
+ <van-badge :content="userInfo.orderInfo?.finishedNumber || ''">
<cp-icon name="user-finished" />
+ </van-badge>
<p>已完成</p>
</van-col>
</van-row>
</div>
</div>个人中心-快捷工具
实现:快捷工具栏目渲染
步骤:
- 准备初始化结构
- 准备初始化数据
- 遍历生成多个 cell 组件
代码: 1)准备初始化结构
<div class="user-page-group">
  <h3>快捷工具</h3>
  <van-cell title="标题" is-link :border="false">
    <template #icon><cp-icon name="user-tool-01" /></template>
  </van-cell>
  <van-cell title="标题" is-link :border="false">
    <template #icon><cp-icon name="user-tool-01" /></template>
  </van-cell>
</div>// 分组
&-group {
background-color: #fff;
border-radius: 8px;
overflow: hidden;
h3 {
padding-left: 16px;
line-height: 44px;
}
.van-cell {
align-items: center;
}
.cp-icon {
font-size: 17px;
margin-right: 10px;
}
}2)准备初始化数据
const router = useRouter();
const tools = [
  { label: "我的问诊", path: "/user/consult" },
  { label: "我的处方", path: "/" },
  { label: "家庭档案", path: "/user/patient" },
  { label: "地址管理", path: "/user/address" },
  { label: "我的评价", path: "/" },
  { label: "官方客服", path: "/" },
  { label: "设置", path: "/" },
];3)遍历
<div class="user-page-group">
  <h3>快捷工具</h3>
  <van-cell
    :title="item.label"
    is-link
    :to="item.path"
    :border="false"
    v-for="(item, i) in tools"
    :key="i"
    @click="router.push(item.path)"
  >
    <template #icon><cp-icon :name="`user-tool-0${i + 1}`" /></template>
  </van-cell>
</div>个人中心-退出登录
实现:退出功能
步骤:
- 准备按钮
- 实现退出
- 确认框
- 清除 token
- 跳转登录
代码:
1)准备按钮
<a class="logout" href="javascript:;">退出登录</a>.logout {
display: block;
margin: 20px auto;
width: 100px;
text-align: center;
color: var(--cp-price);
}2)实现退出
import { useUserStore } from "@/stores";

// ... 省略 ...

const router = useRouter();
const store = useUserStore();

const loginOut = async () => {
  await showConfirmDialog({
    title: "温馨提示",
    message: "您确认要退出优医问诊吗?",
    cancelButtonText: "取消",
    confirmButtonText: "确认",
  });
  store.delUser();
  router.push("/login");
};权限控制-页面访问权限
实现:需要登录的页面,需要判断是否有
token
步骤:
- 定义白名单
- 判断,如果没有登录且不在白名单内,跳转到登录
代码
// 访问权限控制
router.beforeEach((to) => {
  // 1. 定义白名单
  const whiteList = ["/login"];
  // 用户仓库
  const store = useUserStore();

  // 2. 如果没有登录且不在白名单内,去登录
  if (!store.userInfo?.token && !whiteList.includes(to.path)) return "/login";
  // 否则不做任何处理
});提问:
- 如果
/register也不需要登录,写哪里?const wihteList = ['/login', 'register']
权限控制-401 和统一异常提示
utils/request.ts
//  ... 省略其它代码
+ import { useUserStore } from '@/stores'
+ import { showFailToast } from 'vant'
+	import router from '@/router'


//  响应拦截器
request.interceptors.response.use(
  function (res) {
+    // 后台约定,响应成功,但是code不是10000,是业务逻辑失败
+    if (res.data?.code !== 10000) {
+      showFailToast(res.data?.message)
+      return Promise.reject(res.data)
+    }
    // 业务逻辑成功,返回响应数据,作为axios成功的结果
    return res.data
  },
  function (err) {
+    if (err.response.status === 401) {
+			 // 提示用户
+      showToast('登录超时, 请重新登录')
+      // 删除用户信息
+      const store = useUserStore()
+      store.delUserInfo()
+      // 跳转登录,带上接口失效所在页面的地址,登录完成后回跳使用
+      router.push({
+        path: '/login',
+        query: { returnPath: router.currentRoute.value.fullPath }
+      })
+    }
    return Promise.reject(err)
  }
)

export default requestLogin/index.vue
const onLogin = async () => {
  if (!agree.value) return showToast('请勾选我已同意')
  const res = isPass.value
    ? await loginAPI(mobile.value, password.value)
    : await loginByCodeAPI(mobile.value, code.value)
  store.saveUser(res.data)
  showSuccessToast('登陆成功')

-	 router.push('/')
+  const returnPath = route.query.returnPath
+  console.log('returnPath  ----->  ', returnPath)
+  if (returnPath) {
+    router.push(returnPath as string)
+  } else {
+    router.push('/')
+  }
}家庭档案
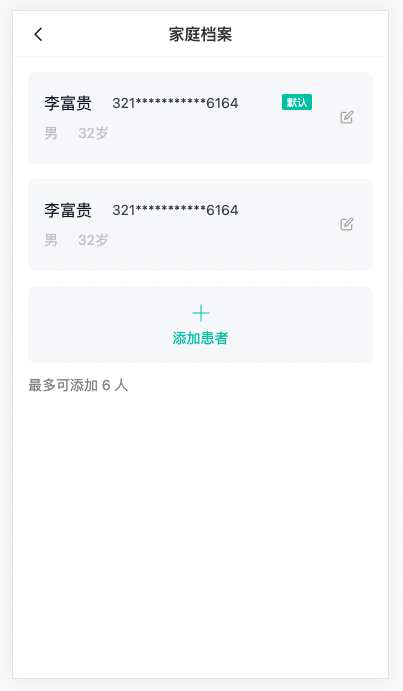
家庭档案-静态结构
实现:路由的配置与组件基础布局
src/views/User/PatientPage.vue
<script setup lang="ts"></script>

<template>
  <div class="patient-page">
    <cp-nav-bar title="家庭档案" />
    <div class="patient-list">
      <div class="patient-item">
        <div class="info">
          <span class="name">李富贵</span>
          <span class="id">321***********6164</span>
          <span>男</span>
          <span>32岁</span>
        </div>
        <div class="icon"><cp-icon name="user-edit" /></div>
        <div class="tag">默认</div>
      </div>
      <div class="patient-item">
        <div class="info">
          <span class="name">李富贵</span>
          <span class="id">321***********6164</span>
          <span>男</span>
          <span>32岁</span>
        </div>
        <div class="icon"><cp-icon name="user-edit" /></div>
      </div>
      <div class="patient-add">
        <cp-icon name="user-add" />
        <p>添加患者</p>
      </div>
      <div class="patient-tip">最多可添加 6 人</div>
    </div>
  </div>
</template>

<style lang="scss" scoped>
.patient-page {
  padding: 0 0 80px;
}
.patient-list {
  padding: 15px;
}
.patient-item {
  display: flex;
  align-items: center;
  padding: 15px;
  background-color: var(--cp-bg);
  border-radius: 8px;
  margin-bottom: 15px;
  position: relative;
  border: 1px solid var(--cp-bg);
  transition: all 0.3s;
  overflow: hidden;
  .info {
    display: flex;
    flex-wrap: wrap;
    flex: 1;
    span {
      color: var(--cp-tip);
      margin-right: 20px;
      line-height: 30px;
      &.name {
        font-size: 16px;
        color: var(--cp-text1);
        width: 80px;
        margin-right: 0;
      }
      &.id {
        color: var(--cp-text2);
        width: 180px;
      }
    }
  }
  .icon {
    color: var(--cp-tag);
    width: 20px;
    text-align: center;
  }
  .tag {
    position: absolute;
    right: 60px;
    top: 21px;
    width: 30px;
    height: 16px;
    font-size: 10px;
    color: #fff;
    background-color: var(--cp-primary);
    border-radius: 2px;
    display: flex;
    justify-content: center;
    align-items: center;
  }
  &.selected {
    border-color: var(--cp-primary);
    background-color: var(--cp-plain);
    .icon {
      color: var(--cp-primary);
    }
  }
}
.patient-add {
  background-color: var(--cp-bg);
  color: var(--cp-primary);
  text-align: center;
  padding: 15px 0;
  border-radius: 8px;
  .cp-icon {
    font-size: 24px;
  }
}
.patient-tip {
  color: var(--cp-tag);
  padding: 12px 0;
}
</style>- 路由
router/index.ts
{
      path: '/user/patient',
      component: () => import('@/views/User/PatientPage.vue'),
      meta: { title: '家庭档案' }
}注意是一级路由
家庭档案-渲染页面
实现:患者的查询操作业务逻辑
步骤:
- 定义 api 函数,以及对应类型
- 挂载后,发送请求
- 插值,渲染界面
代码:
1)定义 api 函数,以及对应类型
- 定义类型
types/user.d.ts,API 文档复制类型
export interface Patient {
  // 代码省略
}- 定义 API:
services/user.ts
/** 获取患者列表 */
export const getPatientListAPI = () => {
  return request({ url: "/patient/mylist" });
};2)实现查询患者业务 User/PatientPage.vue
- 调用 API,保存数据
import { getPatientListAPI } from "@/services/user";
import type { Patient } from "@/types/user";
import { ref, onMounted } from "vue";

// 2. 调用API,保存数据
const list = ref<Patient[]>([]);
const loadData = async () => {
  const res = await getPatientListAPI();
  list.value = res.data;
};
onMounted(() => {
  loadData();
});- 插值,渲染界面
<div class="patient-item" v-for="item in list" :key="item.id">
  <div class="info">
    <span class="name">{{ item.name }}</span>
    <span class="id"
      >{{ item.idCard.replace(/^(\d{6})\d{8}(\d{4})$/, '\$1******\$2') }}</span
    >
    <span>{{ item.genderValue }}</span>
    <span>{{ item.age }}岁</span>
  </div>
  <div class="icon"><cp-icon name="user-edit" /></div>
  <div class="tag" v-if="item.defaultFlag === 1">默认</div>
</div>
<div class="patient-add" v-if="list.length < 6"></div>身份证脱敏处理:(\d{6})\d{8}(\d{4})
- 匹配第一个$1
^(.{6}) - 匹配第二个$2
(.{4})$
添加患者-弹出层显示隐藏
实现:使用 van-popup 完成侧边栏效果
需求:
- 使用 van-popup 组件,实现显示隐藏
代码:
// 1. 定义布尔值控制显示与隐藏
const isShow = ref(false);- 使用
van-popup组件,实现显示隐藏 , 并添加样式代码
User/PatientPage.vue
<!-- 2. 使用van-popup组件,并添加样式代码 -->
<div class="patient-page">

    //  省略上方代码

    <!-- 🔔🔔 注意:写在div.patient-page内 -->
    <van-popup v-model:show="isShow" position="right">
      <cp-nav-bar title="添加患者" right-text="保存" />
    </van-popup>
</div>.patient-page {
padding: 0 0 80px;
+ ::v-deep() {
+ .van-popup {
+ width: 100%;
+ height: 100%;
+ }
+ }
}- 点击事件,修改 isShow
<div
	class="patient-add"
+	@click="isShow = true"
>
  <cp-icon name="user-add" />
  <p>添加患者</p>
</div>- navbar-自定义返回处理函数
<van-popup v-model:show="isShow" position="right">
	<cp-nav-bar
		title="添加患者"
		right-text="保存"
+		:on-back="() => (isShow = false)"
	/>
</van-popup>小结:
- 属性可以传函数吗?
- 可以
- popup 组件怎么双向绑定?
- v-model:show
添加患者-静态结构-收集数据
实现:患者信息录入的表单和绑定数据
需求:
- 表单静态结构
- 数据双向绑定
- 关闭侧边栏、重置表单
代码:User/PatientPage.vue
1)表单静态结构
<script setup lang="ts">
//  省略其它代码

const options = [
  { label: "男", value: 1 },
  { label: "女", value: 0 },
];
</script>

<template>
  // 省略其它代码
  <van-form autocomplete="off">
    <van-field label="真实姓名" placeholder="请输入真实姓名" />
    <van-field label="身份证号" placeholder="请输入身份证号" />
    <van-field label="性别">
      <!-- 单选按钮组件 -->
      <template #input>
        <cp-radio-btn :options="options"></cp-radio-btn>
      </template>
    </van-field>
    <van-field label="默认就诊人">
      <template #input>
        <van-checkbox round />
      </template>
    </van-field>
  </van-form>
</template>2)声明数据、绑定数据
type AddPatient = Pick<Patient, "name" | "idCard" | "gender" | "defaultFlag"> & { 		     gender: number
}PatientPage.vue
const initFormData: AddPatient = {
  name: "",
  idCard: "",
  gender: 1,
  defaultFlag: 0,
};

// 2. 声明表单初始值,数据数据双向绑定
const formData = ref<AddPatient>({ ...initFormData });
// 默认值需要转换
const defaultFlag = computed({
  get() {
    return formData.value.defaultFlag === 1 ? true : false;
  },
  set(value) {
    formData.value.defaultFlag = value ? 1 : 0;
  },
});3)与表单元素,双向绑定,代码省略
4)侧边栏关闭时,重置表单初始值
// 4. 关闭弹出层时,还原表单初始值
watch(isShow, (newValue) => {
  if (!newValue) {
    // 还原表单的初始值
    formData.value = { ...initFormData };
  }
});小结:
- 为什么使用计算属性 get set 写法?
- 组件需要的是 布尔 类型,需要通过计算属性转换一下
- 为什么要解构初始数据?
- 克隆一份新数据,要不然是同一个对象。
添加患者-表单校验
实现:提交的时候校验表单,身份证需要校验格式
需求:
- 点击保存按钮进行校验
- 名字非空,身份证非空
- 身份证格式,性别需要和填写的一致
代码:
1)名字非空,身份证非空
<cp-nav-bar
        :back="() => (show = false)"
        title="添加患者"
        right-text="保存"
+        @click-right="submit"
/>const submit = () => {
if (!patient.value.name) return showToast("请输入真实姓名");
if (!patient.value.idCard) return showToast("请输入身份证号");
};2)身份证格式,性别需要和填写的一致
提示:身份证号,7-14位为出生年月日。
提示:身份证号,倒数第二位,奇数为男,偶数为女。
- 测试号
- 110101198307212600 - 错误
- 110101196107145504 - 错误
- 11010119890512132X - 错误
- 110101196501023433
- 110101197806108758
- 110101198702171378
- 110101198203195893
- 如有雷同纯属巧合,可删除。
pnpm i id-validator由于是比较老的库,没有提供类型,自己定义类型 types/id-validator.d.ts
declare module "id-validator" {
  // 默认导出的,class是es6的类语法,对应 es5 的构造函数
  export default class {
    // es6 类中的方法,对应 es5 的原型方法
    isValid(id: string): boolean;
    getInfo(id: string): {
      sex: number;
    };
    makeID(): string;
  }
}User/PatientPage.vue 使用库进行校验
import Validator from "id-validator";const submit = () => {
if (!patient.value.name) return showToast('请输入真实姓名')
if (!patient.value.idCard) return showToast('请输入身份证号')
+ const validate = new Validator()
+ if (!validate.isValid(patient.value.idCard)) return showToast('身份证格式错误')
+ const { sex } = validate.getInfo(patient.value.idCard)
+ if (patient.value.gender !== sex) return showToast('性别和身份证不符')
}小结:
- 模块默认返回是构造函数怎么写类型声明文件?
declare module 'id-validate' { export default class {} }
添加患者-实现新增
实现:患者的添加操作业务逻辑
步骤:
- 定义 api 函数
- 调用 API,提示用户、更新界面
代码:
1)定义 api 函数
import type { AddPatient } from "@/types/user";

/** 添加患者 */
export const addPatientAPI = (patient: AddPatient) => {
  return request({ url: "/patient/add", method: "POST", data: patient });
};2)调用 API,提示用户、更新界面
+import { addPatientAPI } from '@/services/user'

// ... 省略 ...

const submit = async () => {
  if (!patient.value.name) return showToast('请输入真实姓名')
  if (!patient.value.idCard) return showToast('请输入身份证号')
  const validate = new Validator()
  if (!validate.isValid(patient.value.idCard)) return showToast('身份证格式错误')
  const { sex } = validate.getInfo(patient.value.idCard)
  if (patient.value.gender !== sex) return showToast('性别和身份证不符')

 // 添加
+  await addPatientAPI(formData.value)
+  isShow.value = false
+  loadData()
+  showSuccessToast('添加成功')
}家庭档案-编辑患者
实现:患者的编辑操作业务逻辑
步骤:
- 扩展类型 IEditPatient
- 打开弹出层
- 回填表单信息
- 编写 api 函数
- 复用提交函数,根据 id 区分:新增、编辑
代码:
- 扩展类型
user.d.ts
export type IAddPatient = Pick<
  Patient,
  "name" | "idCard" | "gender" | "defaultFlag"
> & { id?: string };- 打开弹出层
- 回填表单信息
<div @click="showEdit(item)" class="icon"><cp-icon name="user-edit" /></div>const showEdit = (item: Patient) => {
isShow.value = true;
const { id, gender, name, idCard, defaultFlag } = item;
formData.value = { id, gender, name, idCard, defaultFlag };
};<cp-nav-bar
:back="() => (show = false)"
+ :title="formData.id ? '编辑患者' : '添加患者'"
right-text="保存"
@click-right="submit"
/>- api 函数
/** 编辑患者 */
export const editPatientAPI = (patient: IAddPatient) => {
  return request({ url: "/patient/update", method: "PUT", data: patient });
};- 复用提交函数,根据 id 区分:新增、编辑
const submit = async () => {
 // ... 省略其它代码

-  // 添加
-  await addPatientAPI(formData.value)
-  isShow.value = false
-  loadData()
-  showSuccessToast('添加成功')

  // 添加
+  formData.value.id
+    ? await editPatientAPI(formData.value)
+    : await addPatientAPI(formData.value)

+  isShow.value = false
+  loadData()
+  showSuccessToast(formData.value.id ? '编辑成功' : '添加成功')
}家庭档案-删除患者
实现:患者的删除操作业务逻辑
步骤:
- 准备按钮和样式
- 定义 API 函数
- 点击事件,二次确认
- 调用 API
- 提示用户
代码:
- 使用 ActionBar,准备按钮 和样式
</van-form>
+      <van-action-bar  v-if="formData.id">
+        <van-action-bar-button>删除</van-action-bar-button>
+      </van-action-bar>
</van-popup>// 底部操作栏
.van-action-bar {
padding: 0 10px;
margin-bottom: 10px;
.van-button {
color: var(--cp-price);
background-color: var(--cp-bg);
}
}- 定义 API
/** 根据id,删除患者 */
export const delPatientAPI = (id: string) => {
  return request({ url: `/patient/del/${id}`, method: "DELETE" });
};- 点击事件
<van-action-bar v-if="formData.id">
-        <van-action-bar-button>删除</van-action-bar-button>
+        <van-action-bar-button @click="delById">删除</van-action-bar-button>
</van-action-bar>- 二次确认提示
- 调用 API,提示用户
import { delPatientAPI } from "@/services/user";
// ... 省略 ...
const delById = async () => {
  await showConfirmDialog({
    title: "温馨提示",
    message: `您确认要删除 ${formData.value.name} 患者信息吗 ?`,
    cancelButtonText: "取消",
    confirmButtonText: "确认",
  });
  await delPatientAPI(formData.value.id as string);
  isShow.value = false;
  loadData();
  showSuccessToast("删除成功");
};